
Are you ready to elevate your meal game with a simple, quick, and utterly delicious no-yeast pita bread recipe?
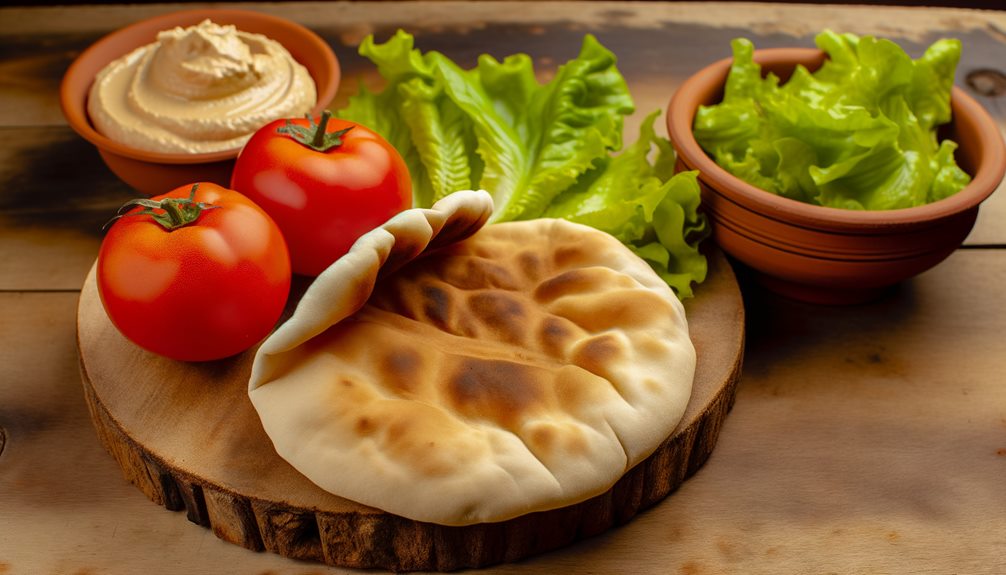
Picture this: warm, fluffy pitas that you can whip up in less time than it takes to order takeout. Imagine the satisfaction of biting into a homemade pita, perfectly puffed and ready to cradle your favorite fillings or accompany a bowl of creamy hummus.
Now, let's dive into the magic of making this versatile bread. All it takes is a handful of ingredients: all-purpose flour, baking powder, a pinch of salt, and warm water.
Want to add a touch of decadence? A splash of olive oil will do the trick! Knead your dough for just a minute and roll it into small circles. Preheat your skillet over medium-high heat, and watch the transformation as your pitas cook for just a couple of minutes on each side, puffing up into fluffy perfection.
But don't stop there! These delightful pitas are just the beginning.
Whether you're looking for innovative filling ideas or fun twists to impress your guests, there's a world of creativity waiting for you.
Ready to satisfy your pita cravings? Let's get cooking!
Ancient Flatbread Origins
Flatbreads have been a staple in many cultures for thousands of years, and their origins are fascinating!
You'll find that these simple, yet versatile, creations often consist of basic ingredients like flour and water, making them accessible to everyone.
As we explore the different cultural variations, you'll see how flatbreads have adapted and thrived across the globe, each with its own unique twist!
Historical Flatbread Significance
Bread has played an essential role in human history, particularly in the form of flatbreads that date back thousands of years. You might be surprised to learn that these ancient staples weren't just about sustenance; they were also steeped in cultural significance. Flatbreads often served as the centerpiece of various flatbread rituals, marking important events, celebrations, and even daily meals.
Imagine a bustling market where families gather, sharing stories and laughter over fresh, warm flatbreads. This communal aspect highlights their historical significance, showcasing how food bonds people together.
As communities evolved, so did the types of flatbreads, each with its unique style and flavor, reflecting local ingredients and traditions. Flatbreads have adapted through the ages, from the simple unleavened varieties of ancient civilizations to the vibrant pita you might enjoy today.
They've been a canvas for creativity, allowing cooks to innovate while honoring culinary history. So, as you begin your pita-making journey, remember that you're participating in a rich legacy. You're not just cooking; you're connecting with countless generations who found joy and nourishment in every flatbread they crafted.
Common Ingredients Used
The foundation of ancient flatbreads lies in a handful of simple yet crucial ingredients. When you engage in making no-yeast pita, you're often working with common flour types like all-purpose, whole wheat, or even gluten-free flours. Each choice brings its unique texture and flavor, so don't be afraid to experiment!
Next up are those essential flavor enhancers. Salt is a must—it boosts the taste and helps balance the dough. You might also consider adding olive oil for that touch of richness. Some folks even toss in spices or herbs to elevate the flavor profile, bringing a hint of innovation to your creation.
Water is your other key player, acting as the binding agent that brings everything together. The magic happens when you mix and knead, transforming these basic ingredients into something truly special.
Cultural Variations Explored
Throughout history, various cultures have created their own versions of flatbread, each reflecting local ingredients and culinary traditions.
Take a moment to explore how Middle Eastern traditions have shaped pita bread's cultural significance. These fluffy pockets serve as a canvas for diverse flavors, making them perfect for street food or family gatherings.
You'll notice Mediterranean influences, too. Regional adaptations turn simple dough into delightful variations, like Turkish lavash or Italian focaccia.
Each culture brings unique cooking methods and serving styles, whether it's baking in a tandoor or grilling on an open flame.
Flavor profiles vary dramatically, from the herbed infusions of the Levant to the rich, buttery notes of North Africa.
Flatbreads often find their way into festive occasions, showcasing how they unite people over shared meals.
Imagine gathering with friends, tearing off pieces of warm bread, and dipping it into a vibrant mezze platter – it's all about connection!
Essential Pita Components
Creating the perfect pita requires a few essential components that come together to form its signature pocket and texture. You might think it's all about the technique, but the right ingredients are critical too!
Let's plunge into what you need to whip up some innovative pita bread that's both fluffy and delicious.
- Flour: All-purpose flour is your go-to, but experimenting with whole wheat or gluten-free options can spice things up.
- Water: Warm water activates the ingredients, so don't skimp on this fundamental part!
- Olive Oil: A splash of olive oil adds richness and helps the dough stay supple.
- Salt: This isn't just for flavor; it also strengthens the dough structure.
- Baking Powder: Since we're skipping yeast, baking powder is your secret weapon for that lovely rise.
When you blend these essential ingredients, you're not just making pita bread; you're starting a culinary adventure!
Each component plays a role, so don't be afraid to get creative. Embrace the process, and soon you'll be enjoying warm, fluffy pitas that are perfect for filling or dipping.
Happy baking!
Beloved Pita Variations
Now that you've got the basics down, let's explore some beloved pita variations that'll spice things up!
You'll love how a quick pita with yogurt can add creaminess, while herbed garlic pita bread will make your kitchen smell amazing.
And if you're in the mood for something with a kick, try filling your pita pockets with spicy chickpeas—trust me, your taste buds will thank you!
Quick Pita With Yogurt
There's something truly satisfying about whipping up a quick pita with yogurt, especially when you're short on time but craving a delicious homemade snack.
This method not only saves you time but brings in the fantastic yogurt benefits, like protein and probiotics, making it a smart choice for quick meals. Plus, you'll be surprised at how fluffy and tasty these pitas turn out!
Here's how you can elevate your quick pita game:
- Flavored Yogurt: Try using herb-infused or spiced yogurt for an extra kick.
- Whole Wheat: For a healthier twist, opt for whole wheat flour.
- Cheese Delight: Incorporate feta or mozzarella into the dough for a cheesy surprise.
- Veggie Boost: Mix in finely chopped spinach or sun-dried tomatoes for added nutrition.
- Dip It: Pair your pitas with homemade tzatziki or hummus for a delightful experience.
These quick pitas are perfect for lunch, snacks, or even as a side for dinner.
You'll impress your friends and family with minimal effort, proving that quick meals can be both easy and delicious!
Herbed Garlic Pita Bread
If you're looking to take your pita-making skills up a notch, herbed garlic pita bread is a fantastic option. This variation infuses your pitas with a delightful aroma and flavor, making them a standout addition to any meal.
By using clever garlic techniques and a robust herb infusion, you'll create pitas that aren't just food but an experience!
Here's what you'll need to elevate your herbed garlic pita bread:
- Fresh herbs like rosemary, thyme, or parsley
- Minced garlic to pack a flavorful punch
- Olive oil for that rich, savory essence
- Sea salt to enhance all the flavors
- A sprinkle of smoked paprika for an unexpected twist
As you knead the dough, don't hesitate to be generous with your herbs and garlic. The more, the merrier!
This isn't just about taste; it's about transforming your pitas into an aromatic delight.
Once baked, your herbed garlic pita bread will be soft, pillowy, and perfect for dipping or stuffing.
Trust me, your friends and family will be coming back for seconds! Enjoy the process and the delicious results!
Spicy Chickpea Pita Pockets
When you crave a hearty meal that bursts with flavor, spicy chickpea pita pockets deliver just that. These delightful pockets are a perfect canvas for your creativity, allowing you to mix and match spicy fillings and chickpea toppings to your heart's content.
Imagine biting into a warm pita, bursting with zesty goodness!
Here are some ideas to get you started:
- Spicy hummus for a creamy base
- Roasted red peppers for a smoky touch
- Sliced jalapeños if you like it hot
- Fresh cilantro to brighten things up
- Feta cheese for a salty kick
You can whip up a quick chickpea salad with spices like cumin and paprika, then load it into your pita.
Top it off with crunchy veggies or a drizzle of tahini sauce for that extra oomph!
Don't hesitate to experiment with flavors; after all, innovation is the name of the game. Each bite will be a delicious adventure, satisfying your taste buds while keeping things exciting.
Baking on a Hot Skillet
When you're ready to bake your pita, picking the right skillet is essential for that perfect puff.
You'll want to get your heat settings just right to avoid burnt outsides and doughy insides.
Plus, I've got some handy cooking time tips to help you master this technique, so your pitas come out fluffy and delicious every time!
Choosing the Right Skillet
Choosing the right skillet can make all the difference when baking pita bread at home. You'll want to take into account both skillet material and skillet size to achieve that perfect puff. A heavy-duty cast iron skillet is a fantastic choice. It retains heat beautifully and distributes it evenly, ensuring your pita gets that necessary blast of warmth for ideal baking.
If you don't have cast iron, a non-stick skillet can work well too, but make sure it can handle high temperatures without warping.
When it comes to size, think about how many pitas you want to cook at once. A larger skillet allows you to bake multiple pitas simultaneously, which is a real time-saver. However, if you only have a smaller skillet, don't fret! You can still create delicious pitas in batches; just keep an eye on the cooking time.
Ultimately, your choice of skillet can elevate your pita-making game. So gear up, grab that skillet, and let's get baking! With the right tools in hand, you'll be on your way to impressing family and friends with your homemade pitas in no time.
Optimal Heat Settings
Getting the heat just right is essential for baking perfect pita bread on a hot skillet. You want that skillet sizzling, but not so much that you scorch your creation. Aim for a medium-high heat setting—think of it as the sweet spot between oven temperature and the heat distribution you need for those fluffy pockets to form.
Preheat your skillet for a few minutes before adding the dough. This helps in achieving that magical puff. If the skillet's too hot, your pitas might burn on the outside while staying raw on the inside. If it's too cool, they won't puff up at all, and you'll be left with sad, flat discs.
A good trick is to sprinkle a few drops of water on the skillet; if they dance and evaporate quickly, you're golden.
Once you place the dough on the skillet, resist the urge to peek too soon. Let the heat work its magic!
Cooking Time Tips
Timing is essential for achieving perfectly puffed pitas on a hot skillet. You want to get that timing just right to release the magic of those no-yeast pitas.
Start by preheating your skillet over medium-high heat. It should be hot enough to sizzle when you place the dough on it. Here's a tip: if you sprinkle a few drops of water on the skillet and they dance around, you're golden!
Now, when you place your pitas on the skillet, resist the urge to peek too soon. Let them cook for about 1-2 minutes until they start to bubble and you see little brown spots forming.
Then, flip them and let the other side cook for another minute or so. Each skillet is a bit different, so keep a close eye on them.
Final Thoughts
Making no yeast pita at home can be a rewarding experience that saves you time and effort. You'll be amazed at how simple it's to whip up this delicious flatbread. Not only is it quick to prepare, but it also opens up a world of culinary possibilities.
Think about the pita health benefits—this versatile flatbread is a great base for countless meals, from wraps to dips. You can get creative with fillings and toppings, making it a fun way to explore flavors. Whether you're stuffing it with fresh veggies or slathering on some hummus, you're in for a treat.
Plus, the satisfaction of making your own pita is hard to beat! As you immerse yourself in the world of flatbread versatility, remember that this recipe allows room for experimentation. You can play with spices, add herbs, or even try different flours.
Your kitchen can become your very own test lab! So, roll up your sleeves, release your inner chef, and enjoy the journey of creating delicious no yeast pita. You'll find it's not just about the bread; it's about the experience of cooking and sharing it with others.
Happy baking!
Questions And Answers
Can I Use Whole Wheat Flour Instead of All-Purpose Flour?
Absolutely, you can use whole wheat flour instead of all-purpose flour! Whole wheat brings fantastic benefits, like added fiber and nutrients, making your pita healthier.
Just remember, it'll change the pita texture a bit, giving it a denser, heartier feel. If you're looking for that rustic vibe, you're in the right direction!
Don't hesitate to experiment; the results might surprise you! Happy baking, and enjoy those delicious, nutritious pitas!
How Long Can I Store Leftover Pita Bread?
Think of leftover pita like a little treasure; you want to keep it fresh!
For ideal pita storage, wrap those fluffy rounds tightly in plastic wrap or place them in an airtight container. They'll stay good for about 3 to 5 days at room temperature, or up to a month in the freezer.
Just remember, bread shelf life can be extended with the right pita storage tips. So, savor those bites for days to come!
Can I Freeze Pita Bread for Later Use?
Absolutely, you can freeze pita bread for later use!
Just wrap each pita individually in plastic wrap or aluminum foil, then place them in an airtight freezer bag. This pita bread storage method keeps them fresh for up to three months.
When you're ready to enjoy, just thaw them at room temperature or pop them in the toaster.
It's an innovative way to prevent waste and enjoy fresh bread whenever you want!
What Are Some Gluten-Free Alternatives for Pita Bread?
Ever found yourself craving pita but needing something gluten-free? You're in luck! Try chickpea flour for a hearty pita substitute, or whip up a blend of almond and coconut flours for a lighter option.
These gluten-free flours create delicious, flexible alternatives that'll satisfy your pita cravings. Plus, you can experiment with spices for a flavor boost.
Who knew gluten-free could be this tasty? Immerse yourself and enjoy your pita adventures!
How Do I Reheat Pita Bread Without Drying It Out?
To reheat pita bread while keeping it soft, try the best reheating methods that focus on moisture.
Wrap the pita in a damp paper towel and microwave it for about 10-15 seconds. Alternatively, heat it in a skillet over low heat, flipping it occasionally to avoid burning.
If you're feeling adventurous, steam it briefly!
Whichever method you choose, you'll enjoy warm, soft pita that's ready for all your delicious dips!
Conclusion
So there you have it—your very own no-yeast pita! You might think it won't puff up like the traditional ones, but trust me, it'll surprise you. Once you see those golden pockets emerge, you'll be hooked. Plus, making them right on your stovetop means you can enjoy fresh, warm pita in no time. Whether you're stuffing them or dipping them, these little flatbreads are sure to brighten up any meal. Happy baking!