
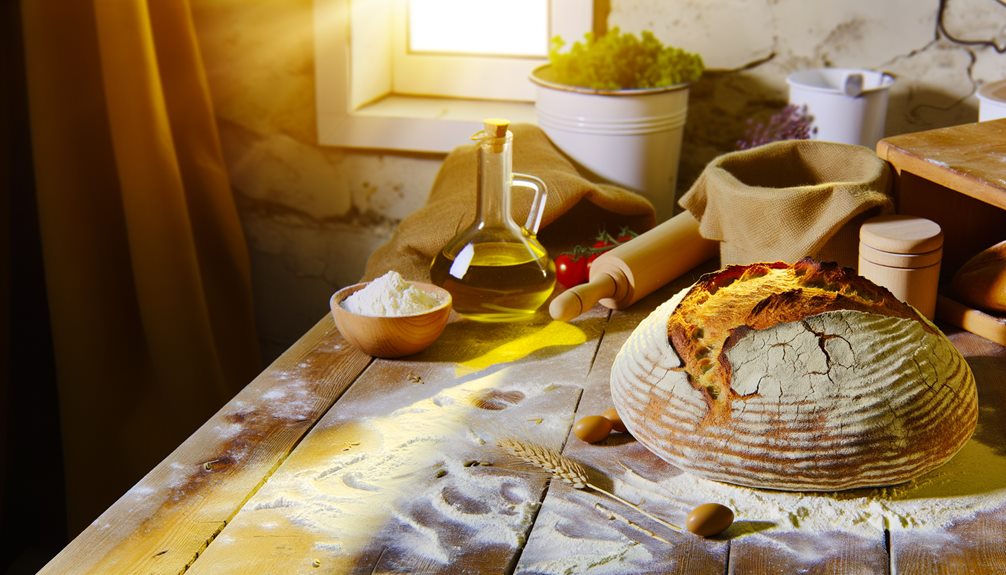
Are you ready to elevate your home baking game without the need for a Dutch oven? Imagine pulling a golden, crusty artisan loaf from your oven, the aroma filling your kitchen, and knowing you made it all by yourself!
With just a few high-quality ingredients—bread flour, warm water, salt, and a pinch of instant yeast—you can create a mouthwatering masterpiece. Simply mix, let the dough rest, and shape it into a beautiful loaf.
But here's the secret: use a preheated baking or pizza stone to achieve that coveted crispy crust, and don't forget to toss in some ice cubes for that essential steam!
In just 30 minutes at 450°F, you'll have a stunning loaf with a chewy inside that will impress anyone lucky enough to taste it.
Don't settle for store-bought bread when you can whip up your own delicious creations at home—once you try this method, you'll be hooked and eager to bake even more!
Ancient Bread-Making Traditions
When you think about bread, it's fascinating to realize how far back its roots go.
Ancient cultures used simple techniques and local ingredients to create this staple, making it a vital part of their daily lives.
Let's explore how these traditional methods shaped not just our recipes today, but also the communities and cultures around them!
Historical Origins of Bread
Though bread has evolved considerably over the centuries, its origins trace back to ancient civilizations where people first combined grains with water and heat. Imagine early humans, foraging for ancient grains like emmer and spelt, then mixing them with water to create a simple dough. They mastered the art of baking over open flames or in hot ashes, which marked the beginning of the bread evolution we recognize today.
As you explore this rich history, you'll see how innovative techniques emerged. Different cultures experimented with wild yeasts, leading to leavened breads that transformed their diets and social structures. Each region added its touch, from the flatbreads of the Middle East to the sourdoughs of Europe.
This diversity in bread-making reflects humanity's ingenuity and adaptability. Understanding these ancient traditions not only connects you to your culinary roots but also inspires your baking journey.
It's fascinating to think that each loaf you create today is a nod to those early bakers, who laid the groundwork for the delicious breads we enjoy now. So, embrace the spirit of innovation as you take on your own artisan bread adventure!
Traditional Techniques and Methods
Building on the rich history of bread-making, traditional techniques have shaped how we create this staple today. You might be surprised to learn that kneading techniques can vary widely, each bringing its own flair to your loaf.
Whether you're using the classic push-and-fold method or experimenting with stretch-and-fold, each technique builds gluten and that delightful texture we crave.
Fermentation methods are another cornerstone of artisan bread-making. From sourdough's long, slow rise to quick-fermenting yeasted breads, each approach affects flavor and structure.
You'll find that allowing your dough to ferment longer can enhance its taste, giving it that complex profile we love.
Don't forget to listen to your dough; it has a way of telling you what it needs. If it feels too sticky, a little more flour might do the trick.
And if it seems too dry, a splash of water could be the answer.
Embrace these traditional techniques, and you'll not only create delicious bread but also connect with the age-old art of baking.
Cultural Significance of Bread
Throughout history, bread has served as more than just sustenance; it's been an essential part of cultural identity and community rituals. Imagine gathering with friends and family, kneading dough together, and sharing stories as you create something that's been a cornerstone of civilization. This is the essence of communal baking—a practice that goes back thousands of years.
In many cultures, bread isn't just food; it carries deep bread symbolism. It represents life, community, and even spirituality. Think about how bread often graces tables during significant celebrations or rituals. From the sourdough of ancient Egyptians to the pita of Middle Eastern gatherings, each loaf tells a story of tradition and innovation.
When you bake bread, you're not just following a recipe; you're participating in a timeless tradition. You're connecting with those who've come before you, embracing their methods while adding your own twist.
Essential Baking Components
Understanding the essential baking components is crucial for creating artisan bread that's both flavorful and textured. When you immerse yourself in baking, knowing what goes into your dough can make all the difference.
Here are four key ingredients to keep in mind:
- Flour Types: Experiment with different flour types. Bread flour gives your loaf strength; all-purpose flour offers versatility. Don't shy away from whole wheat or rye for unique flavors!
- Yeast Options: Choose your yeast wisely. Active dry yeast is easy to work with, while instant yeast can speed up the process. You might even explore sourdough starter for a tangy twist.
- Water Quality: Use filtered water if possible. The right water can enhance yeast activity and improve flavor.
- Salt: Don't underestimate salt! It strengthens gluten and balances flavors. Just the right amount can elevate your bread from good to extraordinary.
As you blend these components, remember that baking is an art form. Embrace the creativity, and let your passion guide you.
With these essentials in your toolkit, you're well on your way to crafting artisan bread that truly delights!
Favorite Bread Creations
When it comes to baking bread, there's nothing quite like creating your own favorite masterpieces.
You might find yourself enchanted by the simplicity of a No-Knead Rustic Loaf, or perhaps you're itching to try a Sourdough Focaccia Variation that'll impress your friends.
And let's not forget the delightful aroma of Herb-Infused Artisan Bread that fills your kitchen; it's hard to resist, right?
No-Knead Rustic Loaf
With just a few simple ingredients and minimal effort, you can create a beautiful No-Knead Rustic Loaf that's perfect for any occasion.
This bread showcases the magic of the no knead technique, delivering rustic flavors that will impress your friends and family. You'll love how easy it's to whip up!
Here's what you'll need:
- Flour – Choose high-quality bread flour for the best rise.
- Water – Warm water helps activate the yeast effectively.
- Salt – A must for flavor; don't skimp!
- Yeast – Instant yeast works wonders in this recipe.
Mix these ingredients, let the dough rest, and watch as it transforms.
You'll enjoy the delightful aroma wafting through your kitchen as it bakes. The crust comes out golden and crispy, while the inside remains soft and chewy.
Experiment with herbs or add olives for an innovative twist!
This No-Knead Rustic Loaf isn't just a bread; it's an experience. So grab your ingredients, roll up your sleeves, and let the magic happen.
You won't believe how satisfying it's to slice into your very own creation!
Sourdough Focaccia Variation
Transforming your sourdough starter into a delightful focaccia is a rewarding way to elevate your bread-making skills. Imagine the aroma wafting through your kitchen, enticing everyone around.
Plus, it's incredibly versatile! You can get creative with focaccia toppings that make each loaf unique. Here's a quick list to inspire you:
- Fresh Herbs: Rosemary, thyme, or basil add a fragrant touch.
- Cheese: Crumbled feta or mozzarella melts beautifully into the dough.
- Vegetables: Roasted cherry tomatoes or caramelized onions provide a burst of flavor.
- Olives: Kalamata or green olives give a savory kick.
You'll find that using your sourdough starter gives the focaccia a lovely depth of flavor. The process is simple—just mix, let it rise, then dimple the dough before adding your favorite toppings.
Bake until golden and crispy, and you'll have a show-stopping bread to share (or keep all to yourself, we won't tell!).
This focaccia variation isn't just bread; it's a canvas for your culinary creativity. So, grab your starter, and let's bake something that'll impress everyone at the table!
Herb-Infused Artisan Bread
Creating artisan bread at home opens up a world of flavors, and herb-infused variations offer a delightful twist on the classic recipe.
You can elevate your baking game by experimenting with different herb selections, which can transform the simplest dough into something extraordinary. Imagine biting into a warm loaf that bursts with aromatic flavor profiles.
Here are four herb-infused ideas that'll inspire you:
- Rosemary and Sea Salt: The earthy aroma of rosemary paired with a sprinkle of sea salt creates a rustic delight.
- Basil and Garlic: This combo reminds you of sunny Italian kitchens, perfect for sandwiches or simply dipping in olive oil.
- Thyme and Parmesan: The nutty flavor of Parmesan complements the subtle notes of thyme, making it a fantastic table loaf.
- Oregano and Sun-Dried Tomatoes: This Mediterranean twist adds a burst of flavor, perfect for serving alongside pasta dishes.
Baking Stone for Crispy Crust
If you want that perfect, crispy crust on your artisan bread, investing in a good baking stone is a must.
Choosing the right stone and preheating it properly can make all the difference in your baking results.
Plus, with a little care and maintenance, your baking stone will be your best friend in the kitchen for years to come!
Choosing the Right Stone
When it comes to achieving a perfectly crispy crust on your artisan bread, the choice of baking stone is fundamental.
You'll want to take into account the baking stone materials, as they play a significant role in how your bread turns out. For the best results, opt for stones made from cordierite or ceramic. These materials excel in heat retention, allowing for an even baking surface that mimics the conditions of a traditional brick oven.
Don't overlook thickness either—thicker stones hold heat better and help maintain consistent temperatures, which is essential for that golden, crunchy crust you're after. A thin stone might heat up quickly, but it can't hold onto that heat during the baking process, leading to disappointing results.
Also, choose a stone that fits your oven. If it's too large, you won't get proper airflow, and if it's too small, you mightn't achieve that perfect rise.
Preheating for Optimal Results
Preheating your baking stone is essential for achieving that irresistible crispy crust on your artisan bread. To reveal the perfect texture, you'll want to crank up your oven temperature to about 450°F (232°C). This high heat simulates the conditions of a traditional bakery oven, giving your bread that professional touch.
But remember, it's not just about the temperature; the preheating duration matters too. Aim to preheat your baking stone for at least 30 minutes. This allows the stone to absorb the heat, ensuring even cooking throughout your loaf.
While you're waiting, you can prepare your dough with confidence, knowing that the stone will provide that magic touch. If you're feeling adventurous, you might even toss in a few ice cubes on a pan below the stone to create steam. That'll elevate your crust to a whole new level!
Maintaining Your Baking Stone
After achieving that perfect crispy crust, you'll want to keep your baking stone in top shape for future loaves. Proper stone maintenance is key to ensuring that every bake turns out beautifully.
Start with effective cleaning techniques; after each use, let the stone cool down, then scrape off any residue with a spatula. For stubborn spots, a damp cloth can work wonders—just avoid soap, as it can affect your bread's flavor.
Temperature control is essential too. Always preheat your stone thoroughly to avoid cracking. If it does crack, don't fret! There are repair methods you can employ, like using high-temperature adhesive specifically designed for baking stones.
When it comes to seasoning tips, some bakers swear by a light oiling after cleaning to keep the surface non-stick and enhance flavor.
As for storage solutions, keep your stone in a cool, dry place, preferably with a protective cover to prevent dust and scratches.
Final Thoughts
Baking artisan bread can be a rewarding experience that transforms simple ingredients into a delicious creation. You'll find joy in experimenting with flavors and techniques that break free from traditional baking myths.
No Dutch oven? No problem! You've got the power to innovate and create amazing bread right in your own kitchen.
As you engage in the process, remember that great bread storage is key to preserving that hard-earned crust and soft interior. Storing your bread in a paper bag rather than plastic will help maintain its texture, allowing you to enjoy each slice as if it just came out of the oven.
Don't be afraid to play around with hydration levels or add your favorite herbs; artisan bread is all about personal expression. Each loaf you bake is a reflection of your creativity.
So, grab that mixing bowl, let your imagination run wild, and enjoy the journey.
In the end, the satisfaction of pulling a loaf from the oven, with its golden crust and irresistible aroma, will make every effort worth it. Happy baking, and remember, experimenting is half the fun!
Questions And Answers
Can I Use All-Purpose Flour Instead of Bread Flour?
You can definitely use all-purpose flour instead of bread flour, but it might change the baking texture a bit.
All-purpose flour has less protein, which means your bread may be less chewy and a tad denser.
If you're feeling adventurous, try mixing in a little essential wheat gluten to boost that protein content!
How Do I Store Leftover Artisan Bread?
Storing leftover artisan bread is like safeguarding a treasure!
The best storage methods include wrapping it in a clean kitchen towel or plastic wrap to keep it fresh.
If you've got more than you can eat, freezing bread is a game-changer! Just slice it first, then pop it in a freezer bag.
When you're ready, let it thaw at room temperature, and it'll taste just as good as day one.
Enjoy your baking!
What Is the Ideal Temperature for Proofing Dough?
The ideal temperature for proofing dough is around 75°F to 80°F.
At this range, you'll boost dough fermentation, allowing those yeast cells to thrive and create that lovely rise.
If it's too cold, the yeast slows down, and you'll be waiting longer.
Too hot? You risk killing the yeast.
Find a cozy spot in your kitchen, and your dough will reward you with a soft, airy texture.
Happy baking!
Can I Add Herbs or Spices to the Dough?
Absolutely, you can get creative by adding herbs or spices to your dough!
Just choose your favorite herb combinations—like rosemary and thyme—or perhaps some garlic powder for a savory kick.
Be mindful of spice ratios, though; a little goes a long way!
Experiment with different blends to find what excites your taste buds.
It's all about personalizing your bread, so don't be afraid to let your culinary imagination run wild!
How Can I Tell When the Bread Is Fully Baked?
Picture your bread as a golden sun setting on the horizon.
To tell when it's fully baked, check the crust texture; it should be deep brown and crisp. A trusty instant-read thermometer can be your best friend here—aim for an internal temperature of about 190°F to 210°F.
When you tap the bottom and hear a hollow sound, you know you've created a loaf that's ready to shine at the dinner table!
Conclusion
Baking artisan bread without a Dutch oven isn't just possible—it's downright fun! With a few simple ingredients and the right techniques, you can create a loaf that'll impress your friends and family. Think of it as a culinary adventure where you're the hero, conquering the kitchen one crusty slice at a time. So roll up your sleeves, grab that baking stone, and let the aromas of fresh bread fill your home!